Change the Remote Desktop listening port in Windows

Change the Remote Desktop listening port in Windows RDP

You can change the default RDP listening port from 3389 to another value by editing the registry.

  • Start Registry Editor.
  • Find and then click the following registry subkey:

HKEY_LOCAL_MACHINESystemCurrentControlSetControlTerminalServerWinStationsRDP-TcpPortNumber

  • On the Edit menu, click Modify, and then select Decimal.
  • Type in the new port number (for example 3390) and then click OK.
  • Quit Registry Editor.

After making the change you will need to connect to the computer by appending the port number to the end of the name or IP address.  For example my.computername.com:3390

Top 10 Windows Keyboard Shortcuts

Top 10 Windows Keyboard Shortcutswindows button

There are many different keyboard shortcuts within Windows, below I have compiled a list of the top 10 that I use the most;

  • CTRL+C: Copy
  • CTRL+X: Cut
  • CTRL+V: Paste
  • CTRL+A: Select All
  • CTRL+Z: Undo
  • ALT+TAB: Switches between running programs
  • Windows Logo+R: Opens the Run dialog box
  • Windows Logo+D: Minimizes all open windows and shows the desktop
  • Windows Logo+L: Locks your computer or brings up the logon screen
  • Windows Logo+E: Opens up Windows Explorer

You can also view this Microsoft link which has a full list of available keyboard shortcuts;
http://support.microsoft.com/kb/126449

Install Windows Backup on Windows XP Home Edition

ntbackup

ntbackup Install Windows Backup on Windows XP Home Edition 

Computer hardware can fail so it is very important that you have a backup in place.  All versions of Windows XP include Windows Backup except for Windows XP Home Edition.  In this article I will explain how you can install Windows Backup on Windows XP Home Edition.

Manual install of Windows Backup

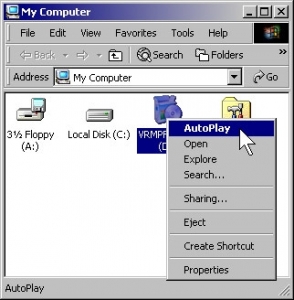
Insert your Windows XP CD into your CD drive. It should autoplay but if it doesn’t then, open My Computer, right-click your CD drive, and then click AutoPlay.

Autoplay

The Welcome to Microsoft Windows XP window will be displayed, click Perform additional tasks and then Browse this CD.

Go into the VALUEADD folder, then into MSFT, and into the NTBACKUP folder.  

Double-click NTBACKUP to start the install. 

open ntbackup

After setup is complete, click Finish

finish

You can now start Windows Backup by clicking Start, All Programs, Accessories, System Tools, and then Backup.

Free Shutdown Command Line Tool Power Save

shut_downHere is a “green” script i have written to allow you to check if PC’s on your Windows network are left on overnight, and if any are found, to force them to shutdown….
It will report on what it is doing so you can see if there are machines that are not shutting down for some reason. It is super simple to use and uses psshutdown command line tool.
All you need to do is change the “computers.txt” file to have a list of the computer names that you want to shutdown, and then run the “shutdown.bat” file to start shutting them down! This is usually done on a machine that stays on, we run it from out SBS server from a scheduled task.

Power Save/Shutdown Script File
This is provided as-is and without warranty, use at your own risk.
Please take the time to follow us on Twitter and “like” our Facebook page if you find this useful!

Change SBS2003 POP3 Connector Interval

email

SBS2003 Exchange POP3 Connector Polling Interval

email

By default the POP3 collector in Small Business Server 2003 has a lowest retrieval of 15 minutes, this can be changed by editing the registry.

1. Locate and then click the following registry subkey:
“HKEY_LOCAL_MACHINE/SOFTWARE/Microsoft/SmallBusinessServer/Network/POP3 Connector”

2. On the “Edit” menu, point to “New”, and then click “DWORD Value”.

3. Type “ScheduleAccelerator” as the entry name, and then press ENTER.

5. On the “Edit” menu, click “Modify”.

6. In the “Value data” box, type the value that you want, and then click “OK”.  To determine the polling interval, the value that is configured on the “Scheduling” tab in the GUI is divided by the value that you type for the ScheduleAccelerator entry. For example, if a 15 minute interval is specified in the GUI and you set the value of the ScheduleAccelerator entry to 3, the connector will poll every five minutes.

7. Quit Registry Editor and restart the “Microsoft Connector for POP3 Mailboxes” service.

Error Configuring Message Service After Running Exmerge Tool

exmerge

exmergeMicrosoft Exchange Mailbox Merge tool or Exmerge.exe allows you to extract mailboxes’ data from an Exchange running computer and then merge it into same mailboxes stored on a different computer running Exchange Server. The tool copies the required data from the root server into.pst files and then merges it in the personal folders into mailboxes stored on the target server. At times, you cannot open the personal storage files after using Exmerge.exe to extract the data to another Exchange Server database. This can occur due to incompatibility issues, new format of Outlook for PST, incorrect.pst privileges or database corruption. As a result, the database becomes corrupt and you need Exchange Server Repair solution.

For example, when you try to run Exmerge.exe to move data from an Exchange Server computer to another, you may receive the below error for various users:

Error configuring message service (MSPST MS) (MAPI_E_EXTENDED_ERROR) (CmapiSession::CreateEMSPSTProfile).

Error opening message store (MSEMS). Verify that the Microsoft Exchange Information Store service is running and that you have the correct permissions to log on. (0×8004011d).”

You cannot open the related psrsonal storage files.

Cause

The Exchange database is corrupted due to incomplete or improper merge operation. This can also occur due to insufficient pst permissions.

The database corruption can also result because of unexpected shutdown and virus issues.

Solution

You should make sure that you use the latest version of Exmerge utility and the.pst (personal storage) files are not marked as read-only. For removing the read-only attribute from.pst file, you need to click its Properties and clear the associated check box.

To restore the lost data for damaged database, you need to use your last backup. If this is absent or seems to be invalid, you need a third-party mailbox extraction tool. Termed as Exchange Repair software, these tools can repair and rebuild a corrupted Exchange database well while maintaining its integrity.

The Exchange Repair Software is highly competent to extract database mailboxes by using powerful scanning algorithms. Also, these tools are easy-to-use products with a graphically rich user interface.

Stellar Phoenix Mailbox Exchange Recoveryis an advanced and non-destructive utility that employs powerful scanning algorithms to repair a damaged Exchange Server database. It is compatible with Exchange Server 5.5, 2000 and 2003. It is a comprehensive Exchange Repair solution with impressive set of features and options. The tool extracts user mailboxes in individual.pst file format files.

Axel Culver has passion for writing Technical article. He is right now writing articles related to Product like Exchange Server Repair tool and Exchange Repair Software. He is a professional writer and has written many blogs, article, press releasing and content for many websites.

Fake Virus in Browser

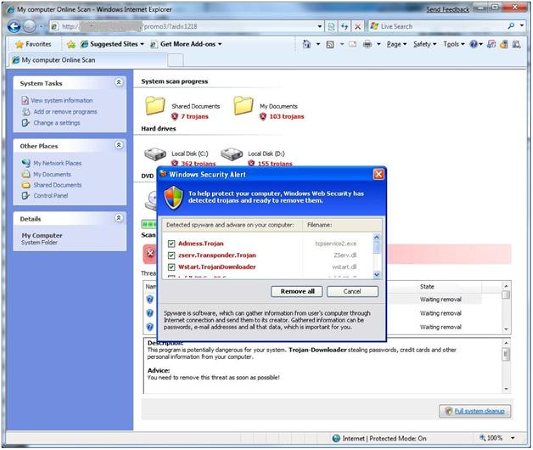
Most people have seen a fake virus infection Web page, but some may not be aware of it. They pop up on your screen and look like a perfectly normal Windows page except they tell you that your PC is infected by a virus and you need to download a program that will clean out the bug for you. The only problem is it’s a complete lie. It’s actually an attack designed to get you to download and possibly pay for some malware.

Usually these fake Windows pages are actually Web pages designed to look like a Windows system page.

Fake Virus

Now, not everyone would fall for this, but I can see how many people would. At a glance, it looks real, but if you look closely, you are just looking at a normal webpage.

The problems get worse when it offers you a gennuine windows pop-up box with some option, at which point you cant be sure the choices it is giving you are correct! the “No” or “Cancel” buttons may be changed for the “yes” buttons. Any click might start a malware download. Once you have one of these pages up, my advice would be to do nothing and hold in the power button on your PC to to a hard reboot, you will loose anything you have open and haven’t saved so be aware of that, but its better than infecting your PC!

Using Backup and Restore in Windows 7

The Backup and Restore feature in Windows 7 is the best built in Windows backup solution yet.  In this article I will explain how you can easily set it up.

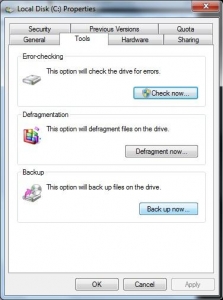
To set up a backup in Windows 7 open up Computer right-click on your local drive and select Properties.  Then click on the Tools tab and click the Back up now button.

Backup Now

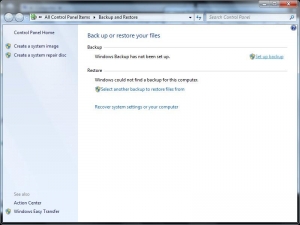
In the Back up or restore your files window click the link to set up a backup.

Set up backup

Windows will search for a suitable drive to store the backup or you can also choose a location on your network.  If you backup to a network location you might need the password to access the share folder.

You can have Windows choose what to backup or you can choose the files and directories required.

Let Windows choose

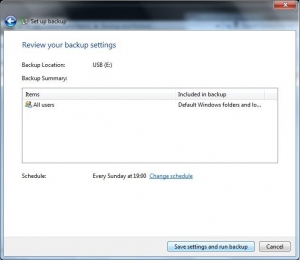
On the next step you get the option to review your settings and setup a schedule.

Review you settings

Once done you can save and run the backup.

Save your backup